Introduction
So what is this all about?
It is about building a complete Quadcopter/Drone from scratch that can be used for filming and aerial photography.
Project status (01.04.2023)
Code: https://github.com/DroneBridge/DroneBridge
Project goals
- Small package for ease of transport. What is a multicopter worth when you can not take it to places that are exciting. I am not a professional filmmaker so what I want is to enjoy my trip in the first place. The drone is the little extra that helps to capture some cool shots from an unusual perspective.
- Capture great photos and videos. The footage will be the final result. If it sucks the whole project has failed.
- Cheap. I am a student with very limited financial possibilities. I won’t do a project if the costs are too high or I could just buy an equal (or better) product for the same amount of money.
- Easy to use. Having to set up the drone for 10min before every flight is not cool or fun.
- Robust. If I have to worry about the drone suddenly dropping out of the sky, loose signal or crashing then the whole thing is useless. You just wouldn’t use it. Drones for filming are heavy (minimum 1kg). Imagine a 1kg+ aluminium block falling out of the sky.
- As much flight time as possible. Nothing more annoying than having to bring three battery packs just to get 15 minutes of flight time.
- Use of very basic materials and tools. I do not have access to rapid prototyping or any other kind of machinery. Just a drill and some saws. Has to be enough to get the job done.
What does this project do differently?
Compared to existing solutions this project aims to:
- Build a robust digital video downlink using DroneBridge
- Provide a real alternative to DJI Lightbridge
- Custom RC & telemetry transmission using raw sockets and custom protocols
- Custom Android app for ease of use
- A high degree of modularisation and extendability!
- All advantages of EZ-WifiBroadcasts technique + a complete copter command and control concept
- iNAV & MAVLink support
- Lots of documentation!
Table of Contents
- Introduction – project goals
- State of the art
- Weight & performance management (Systems Engineering)
- Where to start? (Powertrain guide)
- The radio link (Systems Engineering – DroneBridge)
- Choosing a flight controller
- Choosing a remote control
- Building an airframe
- Setting up a ground station
- Lessons learned
State of the art
In this section, I will give a brief overview of existing hardware solutions.
Consumer drones
In the last few years (2019), the market has been flooded by all sorts of drones from all kinds of companies. Many of them failed because they weren’t able to deliver a good product at an affordable price. Since the release of the Phantom 1 in 2013 by a Chinese company called DJI, it has ruled the market. No other competitor has products that could take on DJI products when it comes to the combination of quality hardware, flight time, usability, video quality and range. Using DJI drones is often referred to as having a flying camera in the sky rather than a drone.
Radio link

While electronics and other hardware components are broadly available. The radio link and flight time might be the hardest part of every drone project. There are several solutions regarding radio technology that could be used for this project:
Traditional radio setup
- RC signal (Throttle, Yaw, Pitch, Roll) and telemetry: One or multiple 2.4GHz digital radios. One for each data channel.
- This includes solutions like the 3DR Radios for telemetry etc.
- Video downlink: 5.8GHz analogue radio.
Advantages:
- No interference between RC and video (robust)
- video over the less used 5.8GHz results in better video quality compared to 2.4GHz
- Low latency video (30ms – 100ms)
- Off-the-shelf components and no need to code new software (plug and play)
- The video gets bad when the signal is weak. A good indicator for signal quality (turn around before signal loss)
- Camera with analogue video out can easily be connected (Hero4, Yi 4K etc.)
Disadvantages:
- Two different radio systems with two antennas on the drone and ground station (weight, package, costs)
- Analogue video: Bad quality and lower resolution compared to digital video. Much more affected by interference. Only 25mW transmitters are allowed in the EU, resulting in short-range and easy signal loss.
- 5.8 GHz penetration
DJI Lightbridge/Occusync
- All digital video downlink (2.4GHz or 5.8GHz)
- Plug and Play/Fly
- Robust
- Low latency (~150ms). Good enough for areal photography
- Very expensive! 1000€ alone for transmitter units
WifiBroadcast
- Open source
- Low latency & up to 14km of reported range (in the EU expect about 1-2km without breaking the law)
- Very cheap! ~100€
- Robust and digital HD video
- Lack of proper RC implementation and documentation
- No custom Android app that fulfils the needs of aerial photography
- More a video downlink project than a complete solution
Weight Management and How Everything Affects Everything
The most important thing when it comes to multi-copters is to do a lot of systems engineering. Every component affects multiple other components. There are just so many parameters that it is nearly impossible to design the optimal system without having custom parts (which I don’t have). The only way is to find the best possible compromise.
Weight directly affects the most important attributes of a UAV. These are flight time, size, hazard in case of failure and maximum possible payload. While a lot of things define weight, weight in return also defines a lot of the components. You need to make sure that the motor-propeller & battery combination reaches its highest efficiency at the given load. A bigger battery will not always result in more flight time. Bigger batteries result in higher weight and thus cause more load on the motors. If the motor/propeller is not operating in the sweet spot it will draw much higher currents which dramatically reduces flight time.
To get an idea of how much the different components add to the total weight I made a chart showing the weights of my first calculations. This should be the first step in development. Getting an idea of how much the system will roughly weigh. Some of the weights are estimated (plastics, screws).
To get the weight approximation you need to have an idea about what components you want to use and how the frame should look like. So in the early stage, it is more like a “do it all at once” approach. Once you get that you start refining. This can take a lot of iterations until you get to a good result.
The above chart gives you some idea of what to expect when you want to build an action camera based drone. The weight will be around 1150 g if you try to keep it low. If you decide to use a retail frame the weight might be 200-500 g higher since those are a lot heavier.
The estimated 1200 g of overall weight will be the starting point for the following powertrain calculations.
Powertrain & Flight Time
Compared to racing drones we do not aim for high speed and acceleration values. A camera drone needs as much flight time as possible while still being able to get the job done. All other characteristics like range, quality, and speed just need to be as good as necessary. This assumption allows us to reduce the complexity of the problem a little. It leaves us with an optimization problem where we want to have the max. flight time while keeping all other components “just good enough”. The definition of “just good enough” is different for every project. Sometimes it is necessary to adjust your definition slightly in order to get better system performance.
With this project, my aim is to get a flight time of somewhere between 22min and 30min. This drone will be very similar to a DJI Phantom, so Phantom components are a really good starting point.
Motors & Battery
I choose the T-Motor 6th Anniversary MN2213. All four of these cost around 70€ (which is really cheap!). Looking at the specs they are a good choice for our project (if we wanted to spend more money there might be better alternatives):
They produce around 600g to 700g of thrust each, running on 3S with the included 9″ propellers. So the current draw is somewhere around 3A while hovering. Tests by other users show that they can easily handle a bigger propeller (~10″). That will increase the efficiency and will give us a hover current of around 2.5A running at 3S.
Using a 4S battery would give us a lot more thrust but efficiency will be lower thus flight time will decrease. This is not something we want, but worth to keep in mind in case we want to have a heavier payload someday.
At this point, we do not know the exact numbers since we just use thrust data gathered by people of the internet. A 3S 5200mAh LiPo (similar to what’s inside the Phantom) will most likely give us the flight time we want.
It took a lot of iterations till I found a good motor, propeller and battery combination. Looking at existing builds or specifications of commercial products definitely helps and speeds up the process. Especially the pre-estimated weights of the battery and overall UAV really help.
Sometimes it can be hard to find proper motor thrust/power consumption data. It is not worth looking at motors that do not come with detailed thrust stand data.
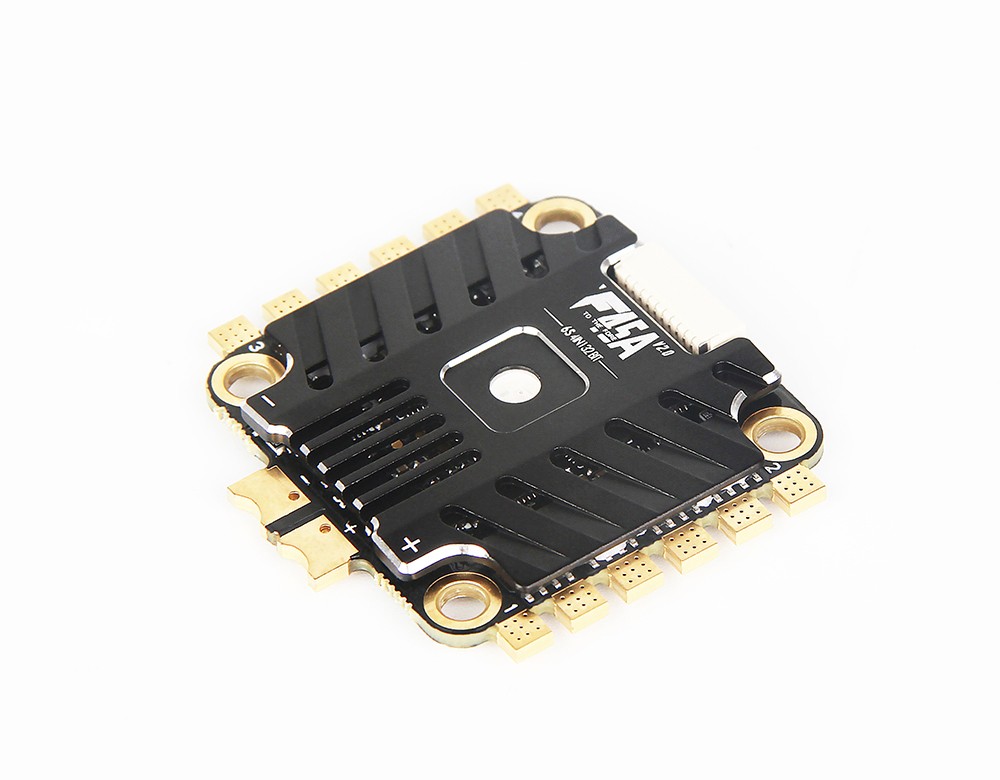
ESCs
Just pick whatever gets the job done. I choose the T-Motor F45A ESC.
Flight Controller
Let’s talk about firmware first. It all boils down to two options:
- Ardupilot/Px4 autopilot
- iNAV
Ardupilot uses MAVLink for all kinds of communication messages. It is very much the standard for hobby projects as well as professional drones. It offers much more compared to iNAV. Examples are: More options for mission planning, better ground control stations (GCS), professional hardware options, software in the loop (SITL) simulators and a library to communicate using MAVLink.
The biggest downside is the size and price of the hardware required to run Ardupilot.
For the GPS module, I use a genuine U-blox neo-M8N module from Drotek. There are many fake products that do not perform that well. I also mounted the GPS-Module on a reflector which massively improved signal quality.
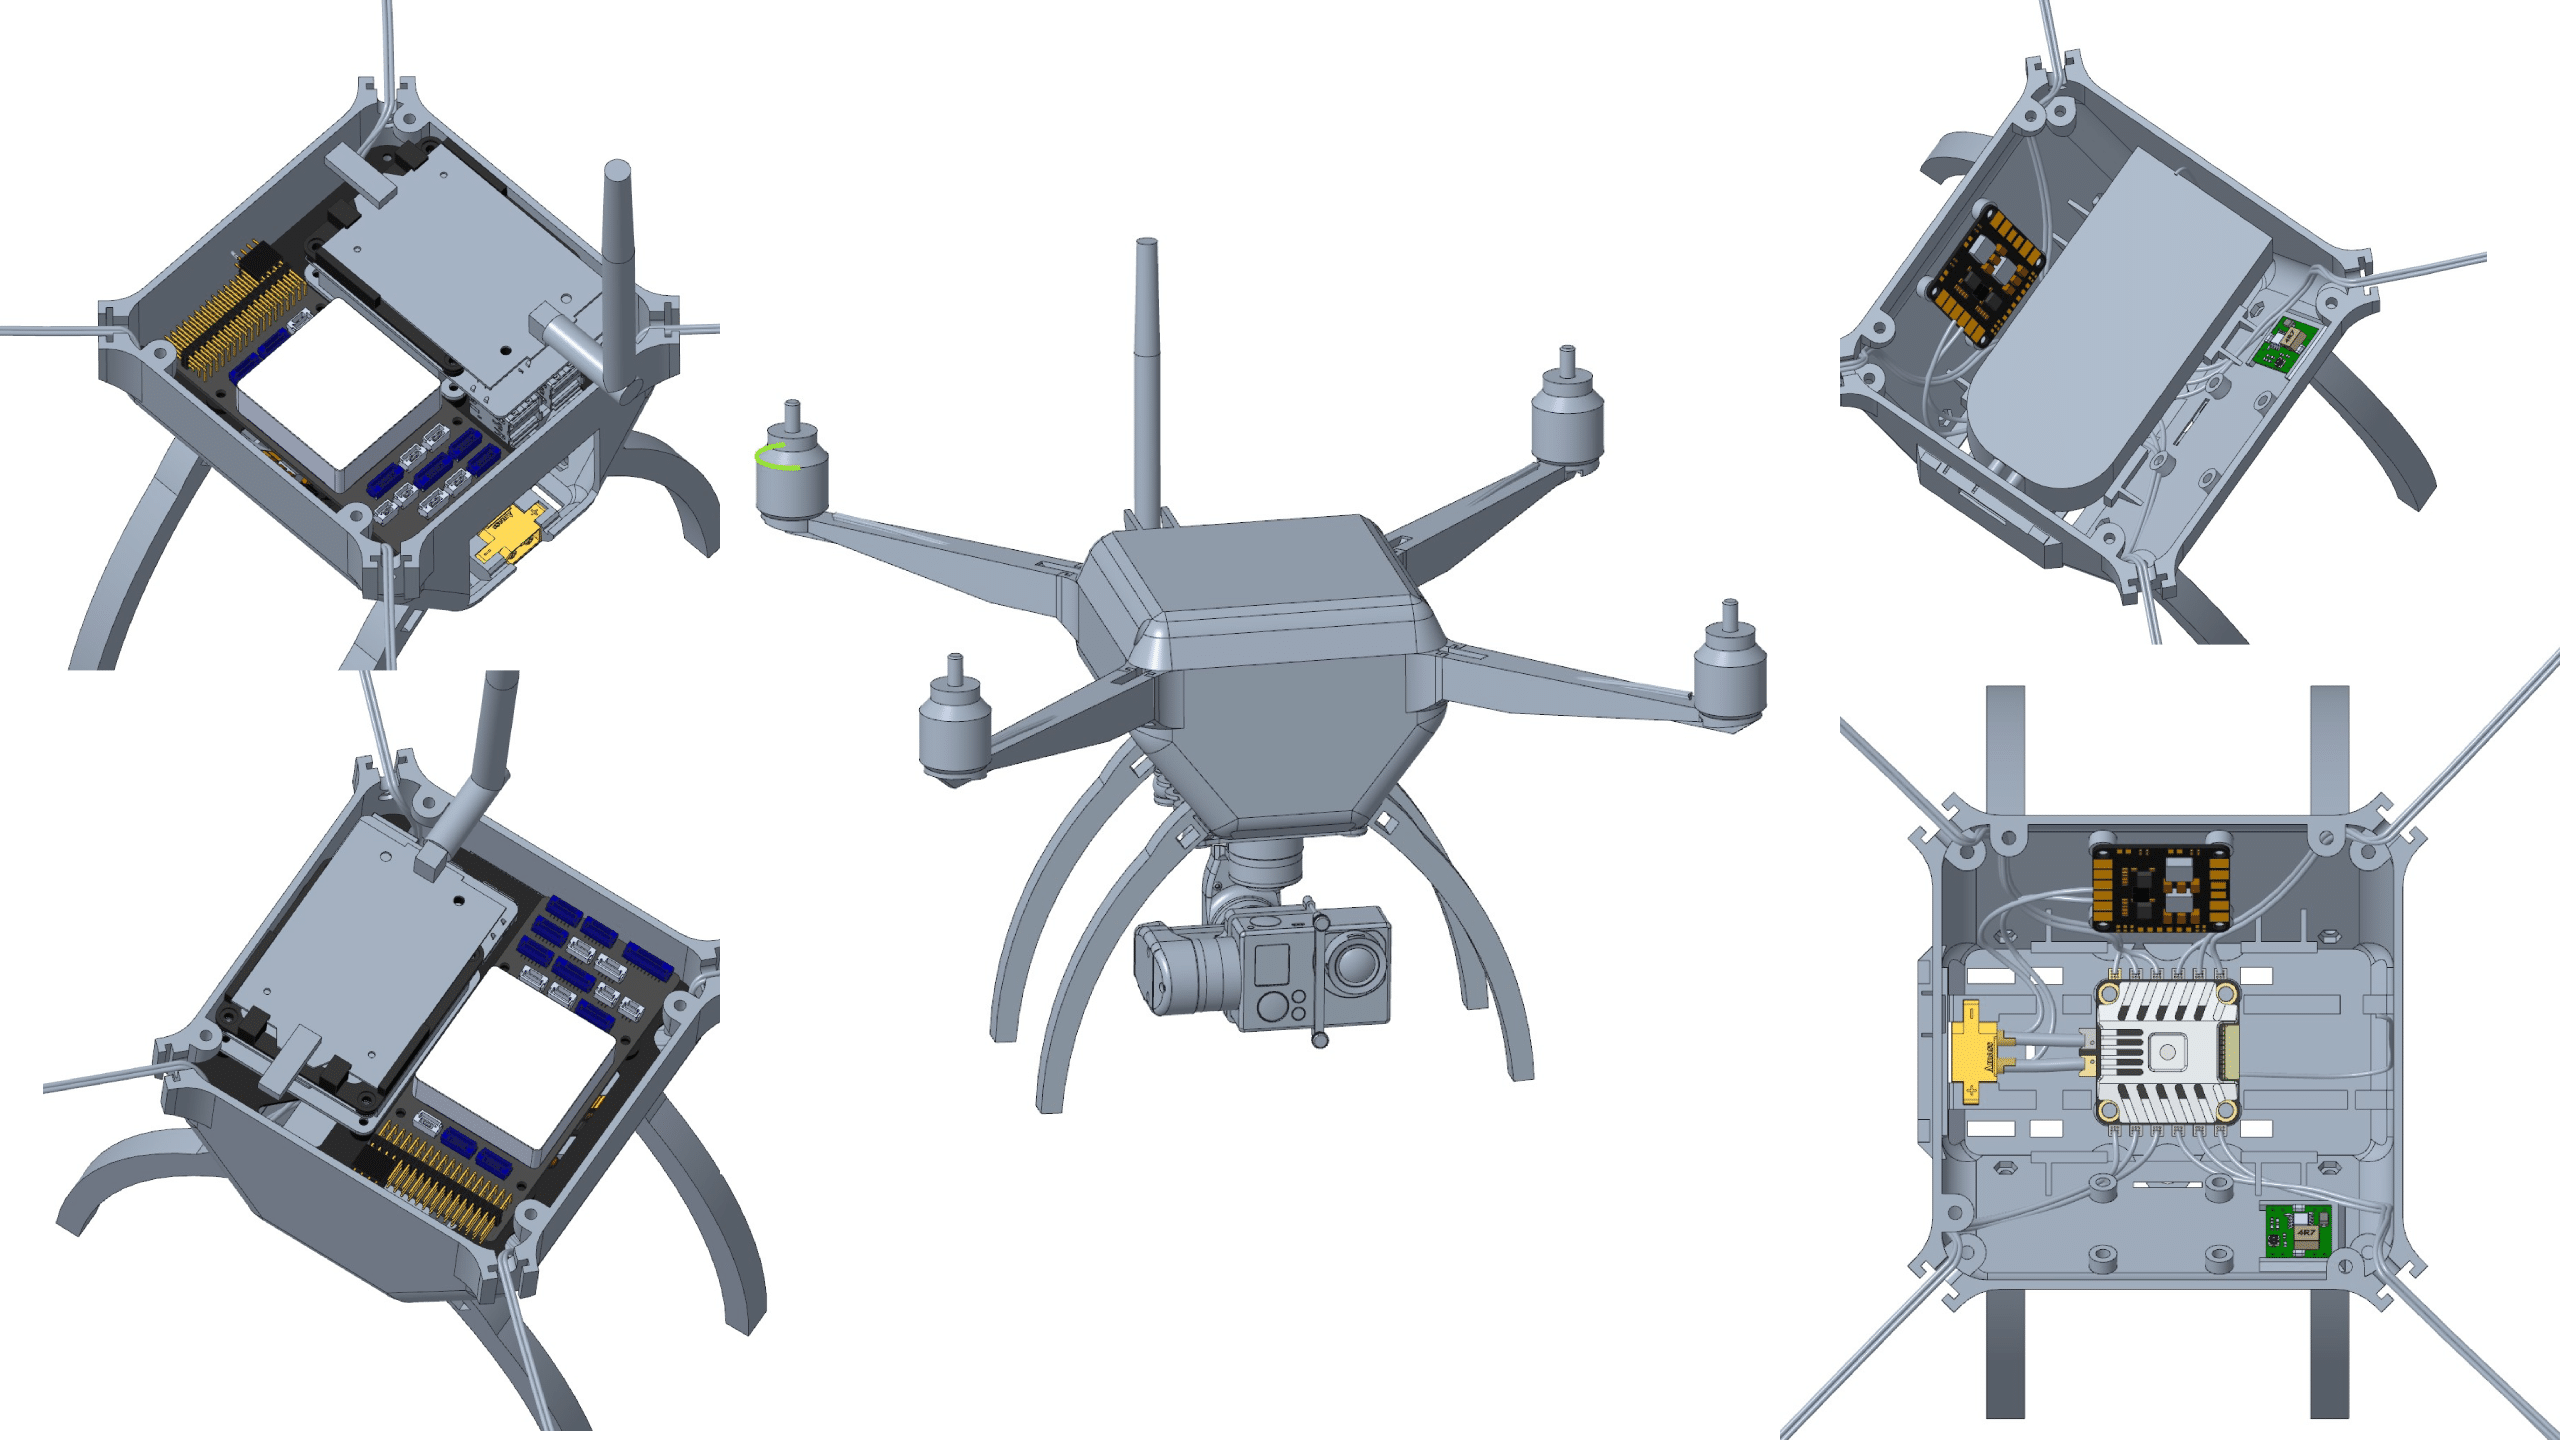
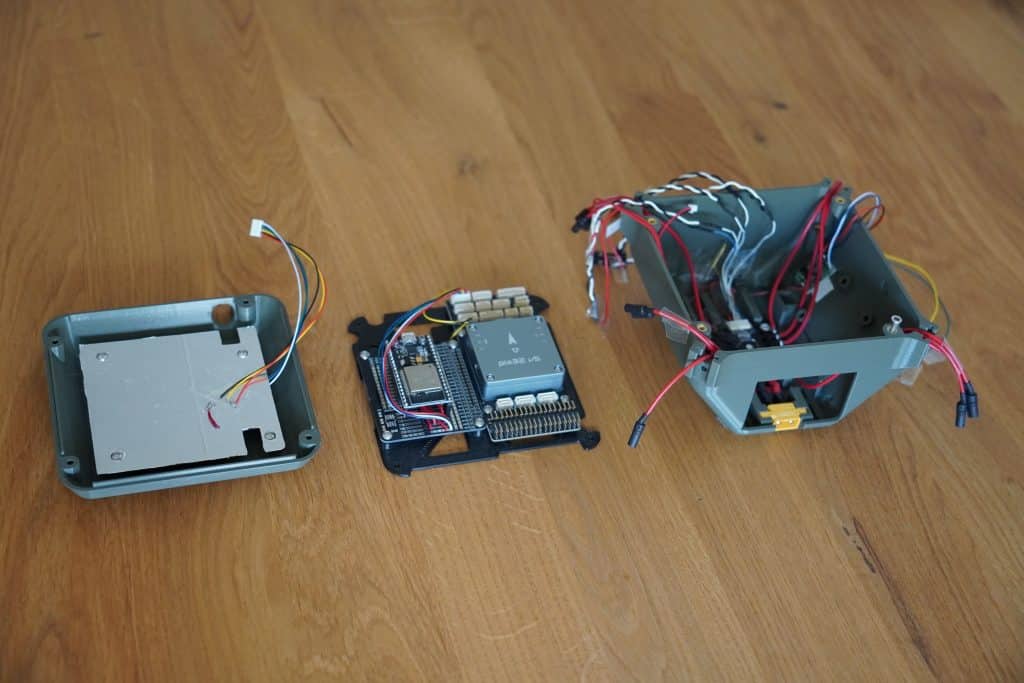
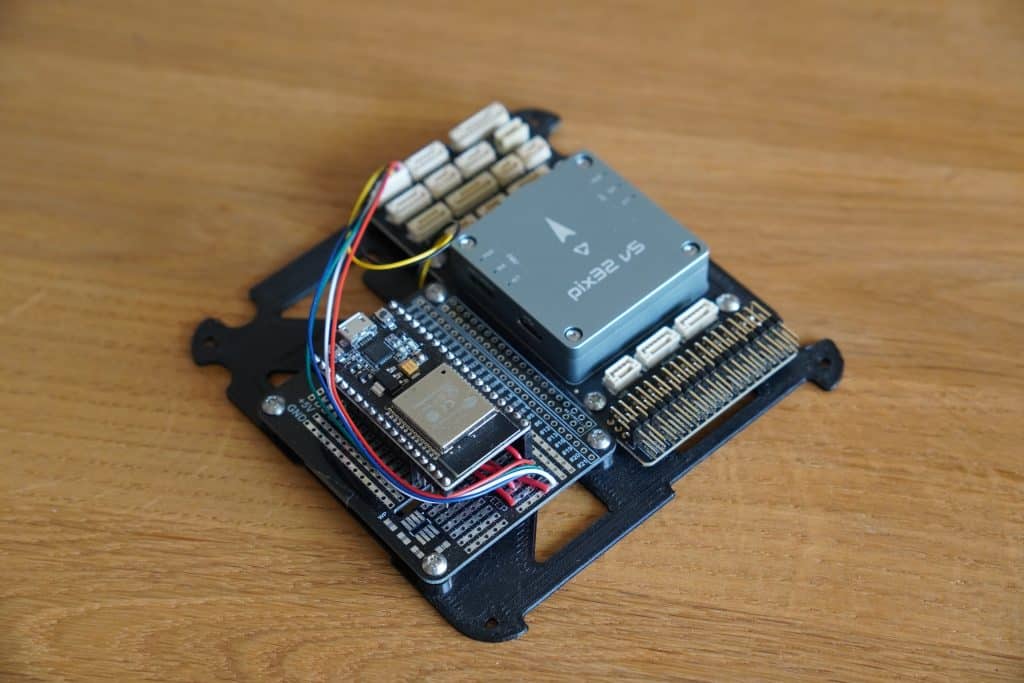
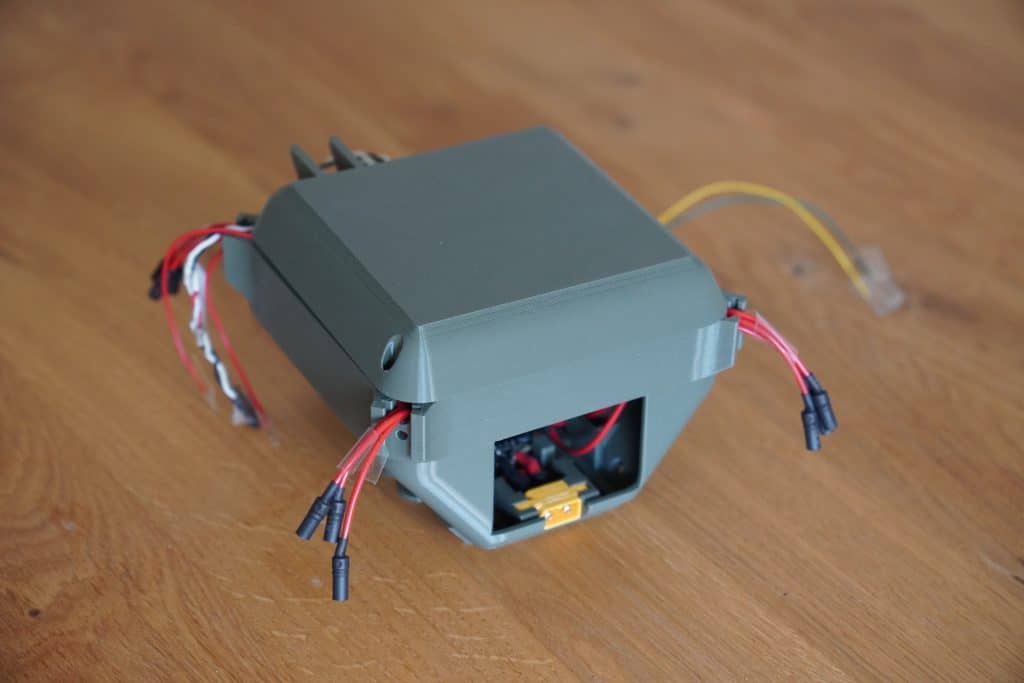
The Frame
CAD-Screenshots:
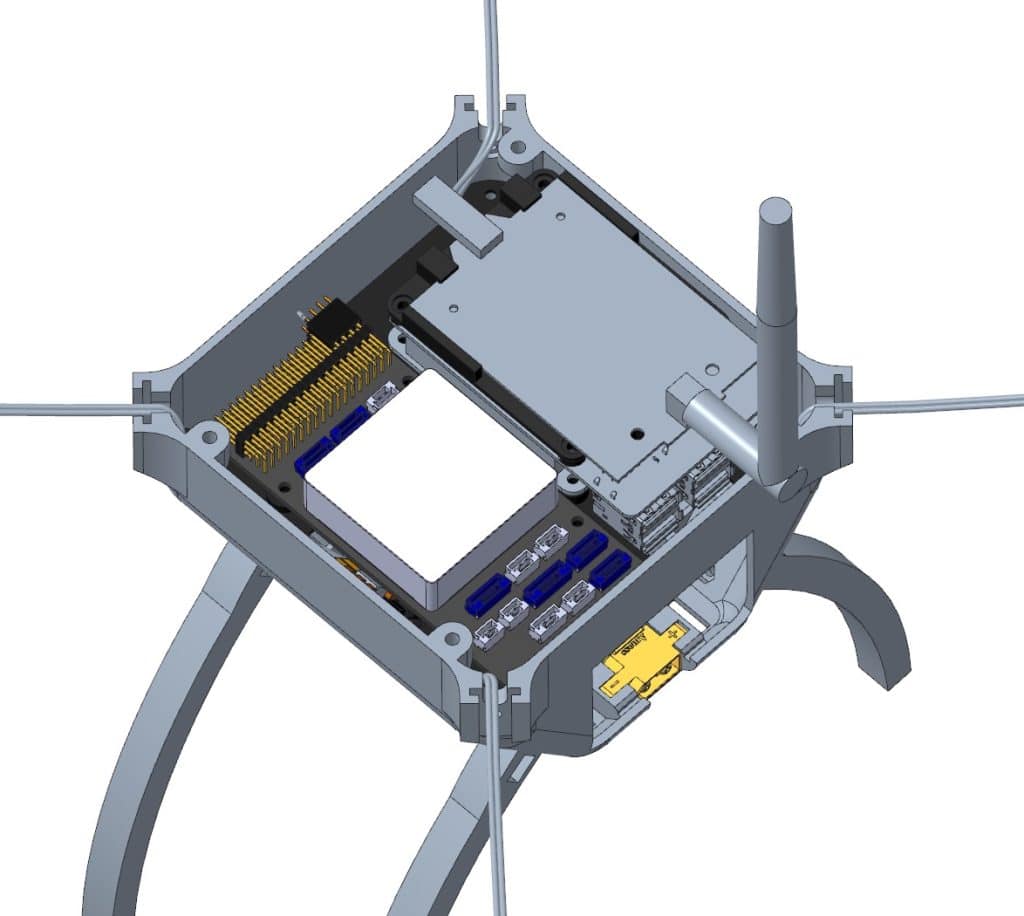
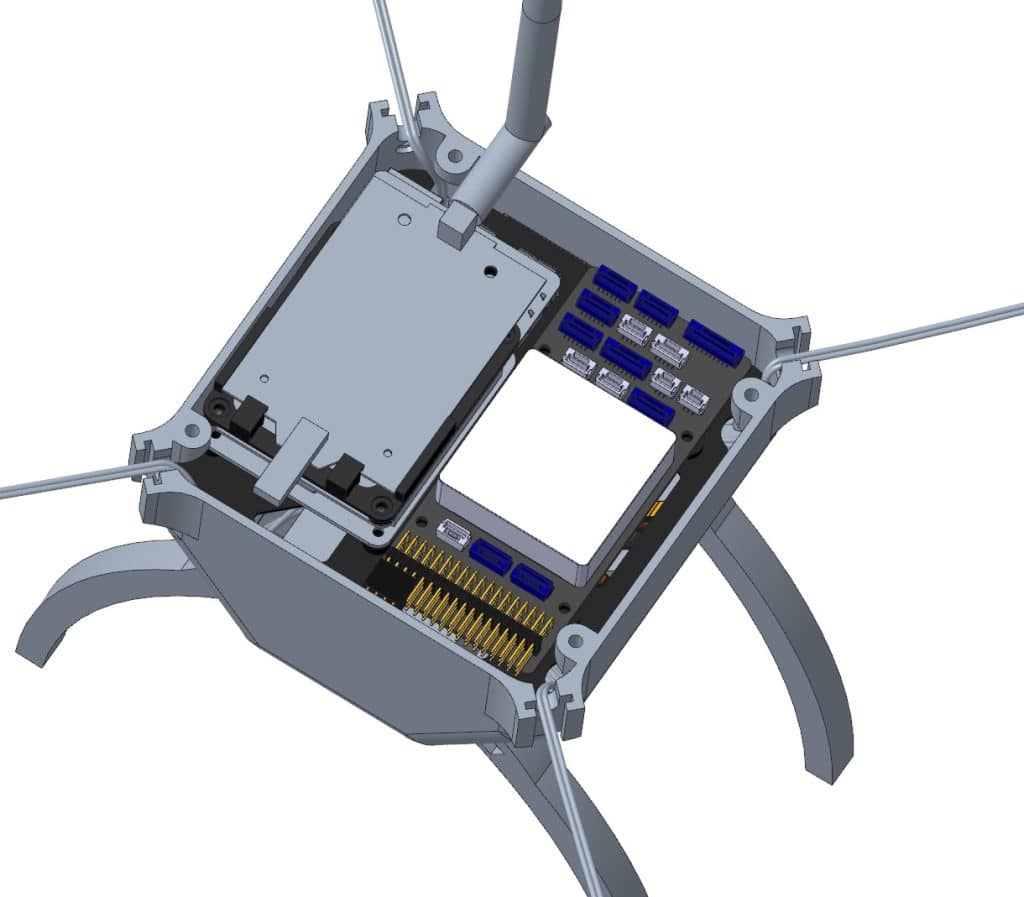
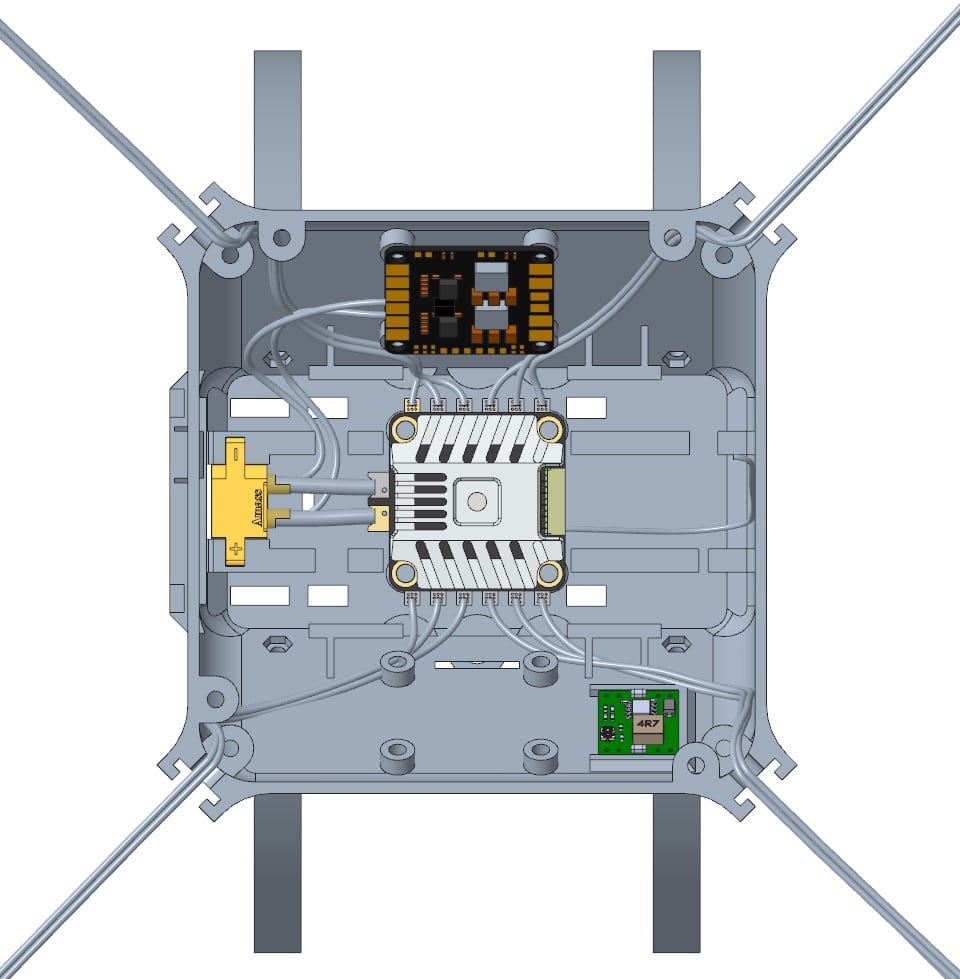
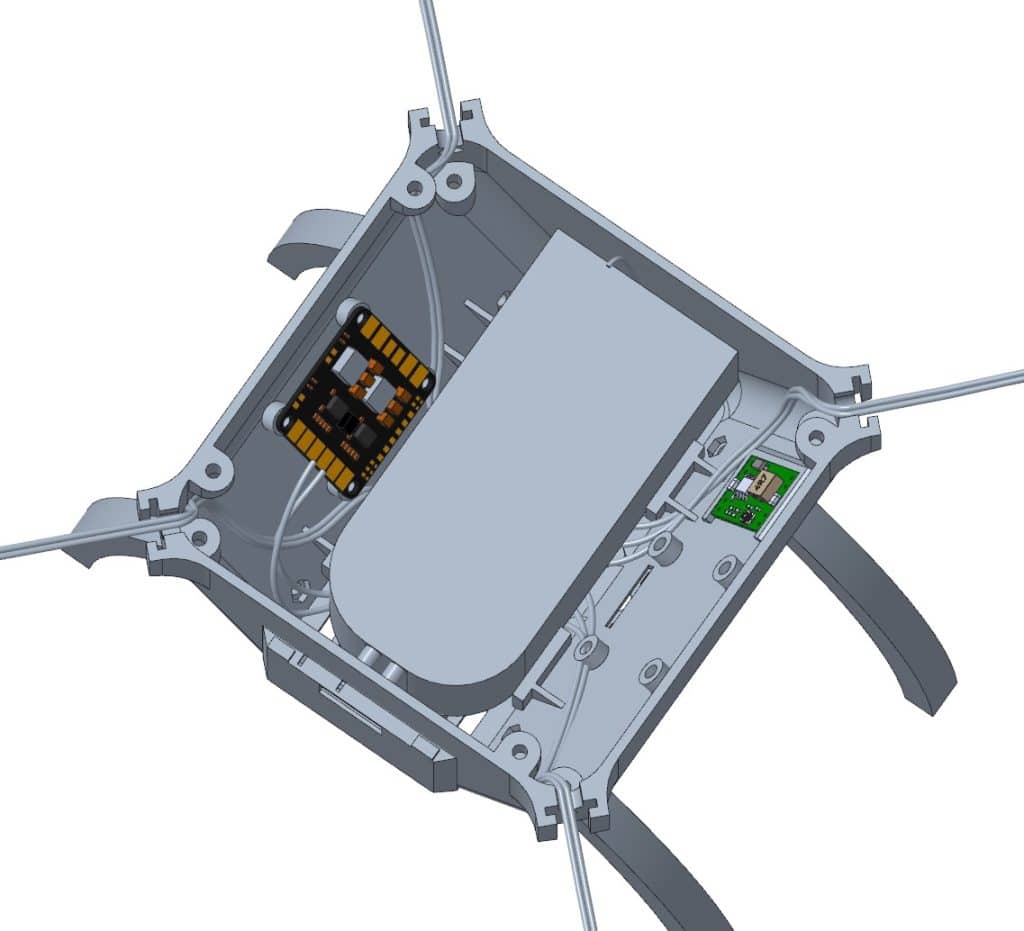
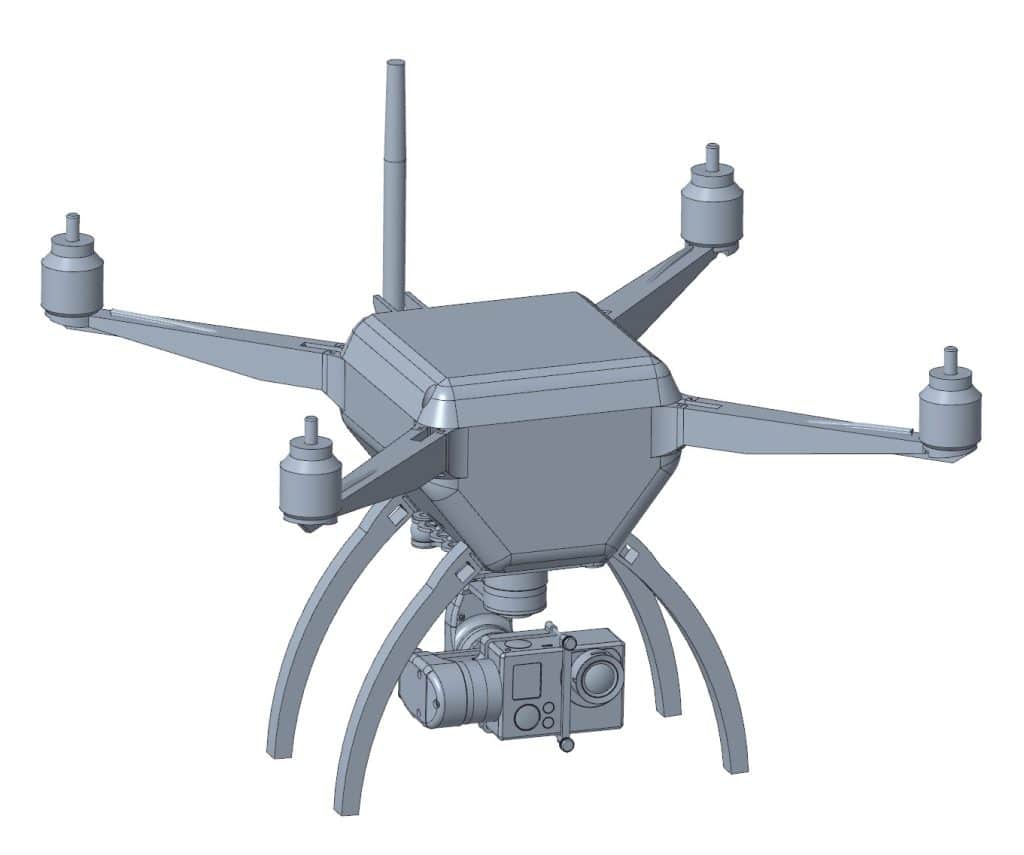
Here are some pictures of the current design. I will try to get some custom PCBs manufactured to reduce the cabling effort for signal lines.
Hello,
I follow you for several months in your project DroneBridge having also long wanted to build a drone dedicated to the photo / video.
To follow you on this project I ordered the following elements to build my drone.
– Turnigy i6S radio with smartphone / tablet support.
– Omnibus F4 Pro flight controller with barometric sensor
– Ublox N8M GPS with Compass
– Four 2312 980 Kv engines with 9450 propellers
– Four controllers 30 A
– Chassis S500 from Hobbyking
– GoPro STORM32 gimbal
– Two Raspberry Pi 3 B
– Two ALFA AWUS036NHA (AR9271)
What will you advise me as batteries? 3S? 4S? 5000 mAh / h?
I did ground tests on flat ground of the DroneBridge link and the resiltat is of the order of 610 meters for the moment with the antennas Omni 3 db.
When the drone will be in flight condition I could do the test ground / Air which should logically be much better. It should be tested with a circular polarization antenna side drone and a directional antenna ground. (and why not an antenna with motorized tracking in the future …)
I keep you informed of my tests.
Laurent
Cool project! Sadly I never really tested the range. Always kept on developing and trusting the guys from wifibroadcast that they are right with their numbers. But in air should def. improve range a lot! New tests from WifiBroadcast (low transmission bit rates I guess) show up to 7km of range!
Do you have any data about power consumption of the motor-propeller combination? Google might find some user tests. Like how much amperes one motor draws runing on 3S/4S while providing 300g of lift etc.
With that data and your overall weight of the drone you can sort of estimate what battery would perform best in your case.
– Lets say your drone is 1300g -> 325g/motor to keep it in hover
– Look up the amps or watts drawn at that load on 3S and see how long a 5200mAh 3S would last etc.
From my experience I would say you are right to go for 5000+mAh. 3S batteries are lighter and give a bit more flight time in my case (at least on paper – did no tests with 4S). So maybe 3S is for you also.
In fact I took the same technical specifications as the DJI Phantom 4 for engines and propellers. The Phantom 4 is also powered by a battery in 4S it seems to me.
For the DroneBridge side, does lowering the Wifibroadcast transfer rate to increase the range affect the DroneBridge protocol such as latency at the RC level or telemetry?
Best regards
Laurent
If it is the same motors that DJI uses then 4S is the go to (as you said DJI uses 4S as well).
The problem is that every motor type is different. KV and stuff does not allow to compare motors on matters of efficiency. Size, quality and number of magnets, diameters, spaces in between the parts, prop diameter, prop angle etc. determine the efficiency. But I’d say that you can’t be wrong by choosing any of the battery types (3S, 4S).
DroneBridge RC, telemetry and status messages take up very little bandwidth compared to the video feed. So lowering the transmission rate should not affect any latency etc. It might become critical on the lowest bit rate settings. But I have not tested that.
Great project, thanks for keeping us up to date!
I actually wanted to post this on DroneBridge but the comments there seem to be closed.
Looking at the hardware diagram I had a question: Wouldn’t the Raspberry Pi easily be capable of providing at least the same funcionality as the ESP32? In other words, allow for direct connection of an Android phone without an additional ground station? I am of course talking about a Raspberry Pi with Wifi.
Hi! thanks 🙂 I closed comments because of a vast amount of spammers.
Yes, that would be possible. The advantage over the ESP would be that we can also send the video stream. I guess we could also have a higher range in case we hook up a high power WiFi card to the AirPi.
In fact, that was the first working setup I had. Just a pure WiFi connection. I ditched it because of the advantages that come with WiFi adapters operating in monitor mode.
The current implementation still contains some code from that time. All modules have a command line argument called “-m (mode)” that can be set to “w” for WiFi, however, it is not implemented at this point.
At the moment I have no time to add it, but I think it would be a nice thing to have in the future.
Hi CYBER,
Nice project you have created.
I am interested in building similar drone for my photography needs, but could`t figure out how to connect my Tx as a source of ppm signal to the Pi-ground station.
Do you have any idea how would I use my ground station to send RC commands to the drone?
Regards
First, you need to convert the PPM signal to a digital signal. You can do that e. g. with an Arduino. Then you feed the digital values via UART from the Arduino to the RPi. Here you need a program that reads the UART and forwards the data to the UAV. You could implement an “UART reader” inside the DB control module. Just read the UART instead of a joystick. DroneBridge control module will handle all the forwarding to the UAV for you. Here is a sample that reads from an OpenTX joystick. In every loop just set the channel value of
JoystickData[i]and callsend_rc_packet(JoystickData);Hello, thank you for sharing the details.
I’m looking for pure wifi based solution for my drone which can send both telemetry and video for a open area range of around 500m. I am new to this dronebridge. Would you guide about which wifi adapter would be suitable and a little bit on how I go about implementing dronebridge for my purpose?
Hi! For supported hardware look here docs supported hardware
Since you want ~500m of range almost all adapters with supported chips should get the job done. I always recommend Alfa AWUS036NHA, but if that one is too expensive or hard to get, go take a look at Ralink cards or Realtek (with chip 8812au; not super stable and supported at that point). You can also choose 5Ghz. Just go check if the Wifi chip of the adapter is on the supported list. External antennas are recommended.
Besides the WiFi adapters you will need a RPi. I recommend the Pi3B (not the +). It is the only one being supported by all projects and got a lot more power than a Pi0(W).
In case I understood you wrong and you want the standard Wifi (with access point) etc. You will not need DroneBridge. Just get high power cards and google Wifi video streaming.
Thank you for your reply.
Actually, I need a wifi adapter with a very light weight (around 25-50g or ) and I’m using an odroid XU4 board, not rpi. If you know any standard wifi module with access point that can get me range of 500m, please inform. Cost is not a concern for me now.
If I go for dronebridge, will it be compatible with odroid XU4 same as rpi? I understand that the tutorials only tell about usage with rpi. Please point to some tutorial for the same if it is available.
Thanks in advance for your help.
The WN722 v1 with the stock antenna is around 22g. It will not get any lighter than that I think. The heaviest part is the antenna. Remove the plastic cover and you might get 3g lower. Apart from that I think that almost all adapters with one or two antennas are in the range of 25g-50g. So no worries on that side.
I am afraid I do not know a high power access point. I would need to do some research on that as well.
DroneBridge works on other device than the Raspberry Pi however I do not provide support for it. You can not use the pre-made images. You will need to patch the Odroid Kernel and install/compile the modules. For encoding & decoding we use Raspberry Pis hardware support (raspbivid). You will need to replace the call to that by something that supports the Odroid.
The camera is the next thing to keep in mind. You can not use a PiCam as far as I know
Please check this tutorial https://dev.px4.io/master/en/qgc/video_streaming_wifi_broadcast.html.
I think this shows it can work on odroid. They have used the logitech USB camera, so I think other USB camera might also work. Can you please check it and tell if I follow this tutorial, I can make it work on my odroid. I am asking this before trying as I would be purchasing the hardware accordingly and I want to the odroid board and a USB camera instead of Rpi.
Please share your opinion.
The system works perfectly fine with any kind of video/data source or SBC/Computer, you just can not use the ready-made DroneBridge/Wifibroadcast images since they are for RPi only.
The tutorial is showing commands to read the camera stream & to display it on the GND. That is what I meant. It requires you to manually build the WBC programs. And then feed the UAV program the video stream. But apart from that it should work with the Odroid as well, in theory since I have not tested it myself. The range will be lower than with the RPi since the ready-made images contain some kernel patches, but 500m is no problem even without patches.
Hi Wolfgang, very nice work! From a purely theoretical standpoint, what’s enabling the increased range compared to a regular Wifi module/protocol? Is it just the fact that you’re using UDP packets rather than TCP?
Hi, sort of. It does not use the concept of an access point. Like UDP it does not guarantee delivery, it just broadcasts the data. (No use of UDP over the long-range link, but same concept) That way, as long as you can pick up any kind of signal, you will be able to receive data. We are also operating at a fixed data rate lower than most WiFi connections. Another big factor is that the system uses patched wifi drivers that push the hardware to its limits when it comes to output power. That is why the max. EIRP must be watched when you want to operate the system legally.
Thanks Wolfgang, that’s helpful.
Hello I am interested in this project and I wanted to know – can I use a USB camera or capture card to connect a bigger camera like DSLR or smth?
Yes. Some users have tested GoPros with a latency of around 180-220ms. Use an HDMI to CSI adapter for the raspberry pi. That will be your best bet. No guaranty it will work since the video input bitrate might be too high from an DSLR for the Pi, but definitely worth a try. USB cameras are not supported out of the box and are very laggy.
Hi I’m really interested in this project (and your 3d printer project). I have barely a gradeschool education. And little income. I noticed you have a mechanical engineering background and was wondering if that is the discipline you would recommend for learning about and building such things or something else? Maybe I should just go for it? I read else ware that you have been constantly changing and updating the parts on this project since you wrote it, and i notice now that many of them aren’t available. Would you be willing to mention what you have changed or what some better options are at this point? You’re projects are really inspiring. I taught myself video editing but now i don’t have access to the software anymore but I wanted to get in to shooting as well and ive always wanted to fly so this sounds amazing. I also want to teach myself coding and i’m undecided on language but i’m leaning toward C#/python since i’m interested in robotics. Sorry for long winded response just wanted to say this is very inspirational. Any advice would be appreciated.
Hi! Thank you! Drones are very much interdisciplinary. You need some mechanics, electronic basics about microcontrollers and a bit of software depending on how much you are planning to add (In my case a lot). First thing first: DroneBridge and many other custom drones will not be able to compete with DJI anymore. They just perfected the Software/Hardware combination and you just can not get a custom drone down to the size of a Mavic. Also cost wise there is not much difference anymore since you can pick up one for 599$/€ and upwards. When it comes to big drones (1.5kg+ payload, customisation etc.) or racing drones the story is different.
I love mechanical engineering but to get really good at it it takes a lot of time and some kind of classes in my opinion. Same goes for electronic design. However basic designs can be done with experiance and self teaching alone. Getting into software is a lot easier I think. Much of the “deeper” stuff is just not relevant for most projects. Most of the time you do not need to care about it. In mechanical/electrical engineering that is different. For software there are lots of sources on the internet, you’ll just need to get used to reading. I had no idea about how drones and micro controllers work back in 2016! I did 3 months of reading and planning till I got my first design on paper ready. It will take quiet some time till your code will look good but you will get there and it will always get better from there on. So just go find something fun to do and just go for it. Thats my recommendation. No matter the disciplin. You’ll quickly figure out what you’ll need to learn to get it working, and then you’ll learn about that.
I manly changed to a flight controller that supports Ardupilot. The Matek F4 series for example is quiet cheap and supports Ardupilot. Besides that, I am currently re-designing the frame and pretty much all the other components stayed the same since they are still working. I am planning on getting a Pix32 v5 flight controller if everything goes well. The Raspberry Pis are still available. The Atheros cards as well. DB even supports newer RTL8812au chips (experimental).
There is plenty of software for video editing. And plenty of ways to get them. Many great edits just use basic transitions. So no excuse here 😉
Python is great! Especially for beginners. I also recommend C or Java since it teaches a lot about the principles of programming and objects.
Keep it up!
Hi, great ideas!
I wanted to know if it was possible to use existing gamestation controllers to send controls to the drone ?
Are there exisiting builds with such controllers or even DIY controllers ?
(Radio transmitters openTX compatible are relatively expensive if I want 16+ channels in order to fullfill my future ever increasing needs)
Or even do you guys plan to integrate joysticks on the android OSD ?
Also do users already made some footages comparing how perform this video over wifibroadcast Vs. over analog in in/outdoors ? I mean this project will always be more HD and cheaper than analog setups anyways, it’s just out of curiosity about the range and cluttered environments
Thank you! In the very beginnings, I added XBOX controller support but it is not compiled into it anymore since the sticks are not so accurate. Since I got the new XBOX Series X controller now I might add that feature again. However, it will only work well if you are using flight modes that have GPS position hold support.
RC via DroneBridge is still experimental. It does not really work very well only using one set of wifi cards and frequency. At the moment I can not recommend it. I have some ideas on how to improve the whole radio link stuff, but my time is limited 🙁
Joysticks on-screen suck, so I will not invest time into that.
I am not aware of any comparison footage, but it sure would be interesting. The HD version will look crisper but the Pi-cameras suck at low light so it will only be handy during a bright day with lots of light indoors.
Pricewise the analog setup will always be cheaper. None of the projects will be able to compete there. Range should be better since we can correct for errors.
One other question is do I have to hotspot share the wifi of my smartphone in order to emit waves ? That is, do I need to get a SIMcard loaded into the phone to use your software ? Regards
No the GND station (RPi) will open a Hotspot that you can connect to
Thanks for these answers, speaking about prices, I thought the dronebridge would be cheaper than the analogic setup — I was thinking of :
– ps2 usb-powered controller 10$
– 2* rpi zero as ground-station = 2*15$
– 2* wifi antenna dongles = 2*~30$
– picam 3$
– phone screen 0$ (already have)
Vs.
– OpenTX controller >100$
– some way to see the fpv >40$ for the watches
– several antennas such as 8xx/9xxMHz crossfire ~60$, some to boost diversity = 2*15$
1) So may I ask why you think an analog setup would be cheaper?
<>
2) So DroneBridge > analog setup in terms or range ? In this DJI mav modes comparison it shows that occusync (~wifi) < RC (analog). I don't know if it shows occusync2.0 though
3) Can DroneBridge keep working for indoor operations with the human several closed-rooms away?
4) About security, is it more secure than analog ? Can anyone intercept the videostream ? Can anyone takeover on controls?
5) Is it anonymous ? Can a spoofer get the "IP address" if any ? The MAC address of the pies ?
The Pi zeros are no good as a GND station. The air-side is maxed out as well, so if you can go get a Pi3 or better there as well.
The Pi cam is ~18$. Not sure what your 3$ model is capable of 😀
The PS2 controller is not supported and probably no fun. You will need to write the “driver” for DroneBridge on your own. But it is very much possible.
Comparing with the $$$ TBS crossfire is not fair 😀
2) When it comes to range it depends a lot on the antennas, but yes DroneBridge will probably give you better range. However 500mW analog setups are also very powerful (but probably not legal).
3) Depends on your walls, antennas etc. I’d say yes.
4) It is about as secure as analog. There is no encryption etc. If you have a DroneBridge/WFB receiver you will be able to see the data and send its own. (The python part has encryption support but that is not enabled by default)
5) It is. There is no personalized ID transmitted etc. The MAC addresses are overwritten by DroneBridge header data.
1) Is there a reason to this ? A user of your software called GlytchTech seems to have no troubles using pi0 on both sides.
2) Would the pi0 handle encryption ? How much power does it provide to the antenna ? Provided that the TBS can go up to 2Watts, is it legit to compare power outputs of two antennas, if one uses analog protocols and the other is digital (dronebridge protocol especially) ?
3) How do authorities detect and react when you overcome the mW threshold ? Is the analog threshold the same for wifi antennas ?
5) Is the overwriting generic for all users using your protocol ? Or does it still uniquely identify setups?
1), 2) He is not using the HDMI out. The OSD was reported to be problematic. The Pi0 is at its limits. There is no room for tinkering and more advanced features. Telemetry encryption should be fine. I do not believe it will handle video encryption.
3) Depends on where you live. Usually, you will have to piss off someone that will eventually investigate and inform the authorities. Max output is also dependant on where you live (analog is way more “intrusive” so the thresholds are usually a lot lower). Digital signals allow for error correction so not directly comparable.
4) Generic, you can set an ID (0-255) that will allow multiple DB links on the same channel.
1) what is the hdmi out for ?
2) Also, are there alternatives to the PiCam ? What about standard quad fpv cams ? example given, caddx tarsier — can it be plugged directly to the embedded pi ? is there a way to plug/solder the fpv cam on the flight controller, and also plug/solder the pi to the FC so that it can receive the video stream to broadcast?
3) Is there a chat server to discuss with dronebridge contributors?
Please read the docs and do some research on your own before asking questions. The HDMI is for diplaying the video with an overlayed OSD. There basically are no other contributors other than me 😉
Hello! First of all thank you for all your work and doccumention!
Recently I’m working in a school project and we are trying to build a drone based on Wifi communication, so I found your dronebridge project. I’m using a ESP-32 to communicate with the drone and I wanted to know if the Dronebridge for ESP-32 has support for RC, to control the drone using the Ground Station joysticks.
I’ve also seen that there is no support to camera streaming using the ESP-32, do you have any advice of how i can implement it?
If you have any additional comment or advice that it could help, please, do not hesitate!
No sadly the ESP32 is not powerful enough to encode a low latency video stream. Good enough for a webcam but not for a drone live stream. The ESP32 implementation also does not support RC. You can however use MAVLink telemetry to send RC commands, that will work. For everything else you will need to do some coding. In theory there is no reason why the ESP32 should not be able to receive RC data via WiFi and forward it to the flight controller.
Well, 2023. how about the project, any progress?
I think the communication link can be based on wfb-ng(which is wifibroadcast, add security etc.), establishing a video link (latency ~50ms) and telemetry packets link (even forward link node).
So what I thinking here. DJI got the right opportunity for the market. And there are other opportunities.
I stopped development since it was very time-consuming and I stopped seeing a personal benefit for it. RPis were also unavailable thanks to the chip shortage, so no one was able to use it anyways. Yes WBC-NG could be integrated. I do see some benefits there. DroneBridge always had the “System” idea, so a lot of things might need a change.